Can I Get a Real Time Twitter Data Feed
Making Sense of Big Data
How to Build a Real-Time Twitter Analysis Application Using Big Data Tools
Crack into Apache Spark and AWS Ecosystem
Data Science/Machine Learning applications have been everywhere now and radically changing our lives and business. With tons of awesome out-of-the-box ML packages today, everyone is able to build models in a fast and cheap fashion. This is particularly true when working on your own laptop as a local playground. However, to build a more exciting and practical machine learning application, big data tools and cloud platforms are what you should take into account in your toolbox. In this article, I will give you a quick tour of building a (near) real-time system using big data tools and cloud platform. Hopefully, you can grasp a big picture of all these "LEGO pieces" after the read.
The Roadmap
Goal:
- A real-time analysis to explore the underlying topics and the sentiment for live tweets;
Note: (1) To avoid flooding ourselves with the tweets on the Internet, I will collect the live tweets filtered by the hashtags #AI, #MachineLearning. In other words, we will explore the latent topics for tweets that are talking about AI and Machine Learning. With the sentiment analysis, we can also catch a glimpse of the public attitudes towards this field. (2) In the end, we will also build a dashboard for visualization.
Python Packages:
- Tweepy to create a stream and listen to the live tweets;
- TextBlob to do simple sentiment analysis on tweets (demo purpose only).
Data Processing Engine:
- Apache Spark;
Note: we will use Spark's machine learning library to train an LDA (Latent Dirichlet Allocation) model for topic modelling, which will give you a quick taste of ML model training in a distributed system. We also use Spark to process the Streaming, for model scoring/inference.
Cloud Platform: AWS;
AWS Services:
- S3: Amazon Simple Storage Service
- Kinesis Data Streams: streaming service to collect and process large streams of data record in real time.
Note: the Tweepy streaming will be the producer that will put data into the Kinesis Data Stream.
- Kinesis Firehose: service to deliver real-time streaming data to destinations such as Amazon S3, Redshift, ElasticSearch, etc.
Note: We use a Kinesis Firehose deliver stream as a consumer of the Kinesis Data Stream, and save the raw tweets into the S3 directly.
- EMR: service that utilizes a hosted Hadoop framework running on the Amazon EC2 (computing instance) and Amazon S3.
Note: we use EMR to run Spark for data processing and model training, in a distributed fashion.
- Athena: a serverless, interactive query service to query data and analyze big data in Amazon S3 using standard SQL.
Note: we will use Athena to access the processed tweets that have been saved in S3.
- QuickSight: a cloud-scale business intelligence (BI) service that you can use to deliver easy-to-understand insights.
Note: We will use QuickSight to connect to Athena to build a dashboard for visualization.
1. Collect tweets from the Twitter Streaming API Using Python
To collect tweets in real time is the very first step for two purposes:
(1) Create the dataset for the ML model training purpose.
(2) The streaming will be used to demonstrate the real-time analysis.
You will need to apply for a Twitter Developer account in order to set up the Twitter streaming. Otherwise, using the Tweepy streaming API is straightforward. An important step is to overload the "on_data" method in the "StreamListener" class so we can put the tweets into Kinesis Data Stream. In this way, we have the producer in our streaming pipeline.
The complete code can be found on GitHub. Here are some highlights:
- Have the Kinesis Data Stream ready so we can put the streaming tweet data into it;
- Overload the "on_data" method for the StreamListner. Usually, you can have some simple processing on the coming tweets (e.g., what fields to keep) in this step meanwhile you may not want to alter the raw data too much (i.e., keep the raw data is a good practice).
2. The Streaming Pipeline
2.1. Kinesis Data Stream
If you are an observant reader, you may find out that we have not created the Kinesis Data Streaming yet when introducing the Tweepy Streaming in the previous section. And yes, you are right! Indeed we need to have the Kinesis Data Stream ready beforehand, so we can ingest the streaming twitter data. Simply sign in to your AWS console, go to Amazon Kinesis and create a Data Stream. It is worth noting the difference between Kinesis Data Stream and Kinesis Data Firehose. Firehose loads data streaming directly into the destination (e.g., S3 as data lake). But in this use case, Kinesis Data Stream fits our need better, since aside from saving the raw data into S3 directly, we are interested in analyzing/processing the tweets in real time. The step of creating a Kinesis Data Stream will be like this:
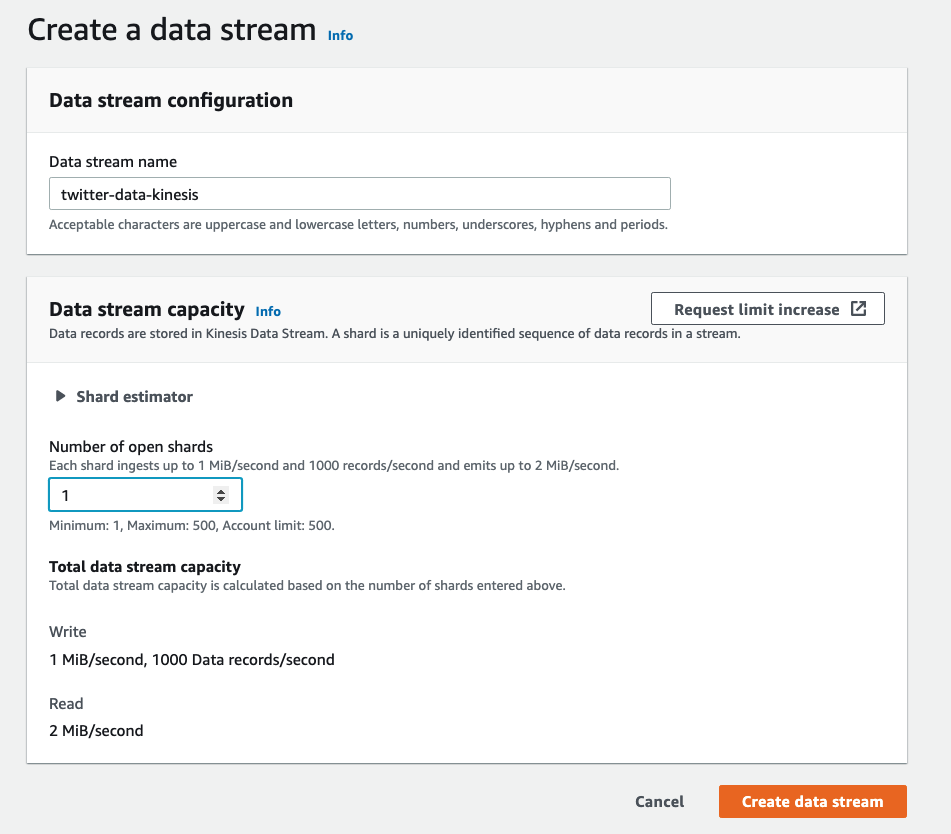
There are two important points to consider when creating a data stream:
- Number of Shards. More shards mean higher throughput capacity. You should estimate the input and output data rate to choose a proper number of shards;
- Retention Period. The time period from when a record is added to when it is no longer accessible is called the retention period. A Kinesis data stream stores records from 24 hours by default, up to 8760 hours (365 days) according to AWS documentation.
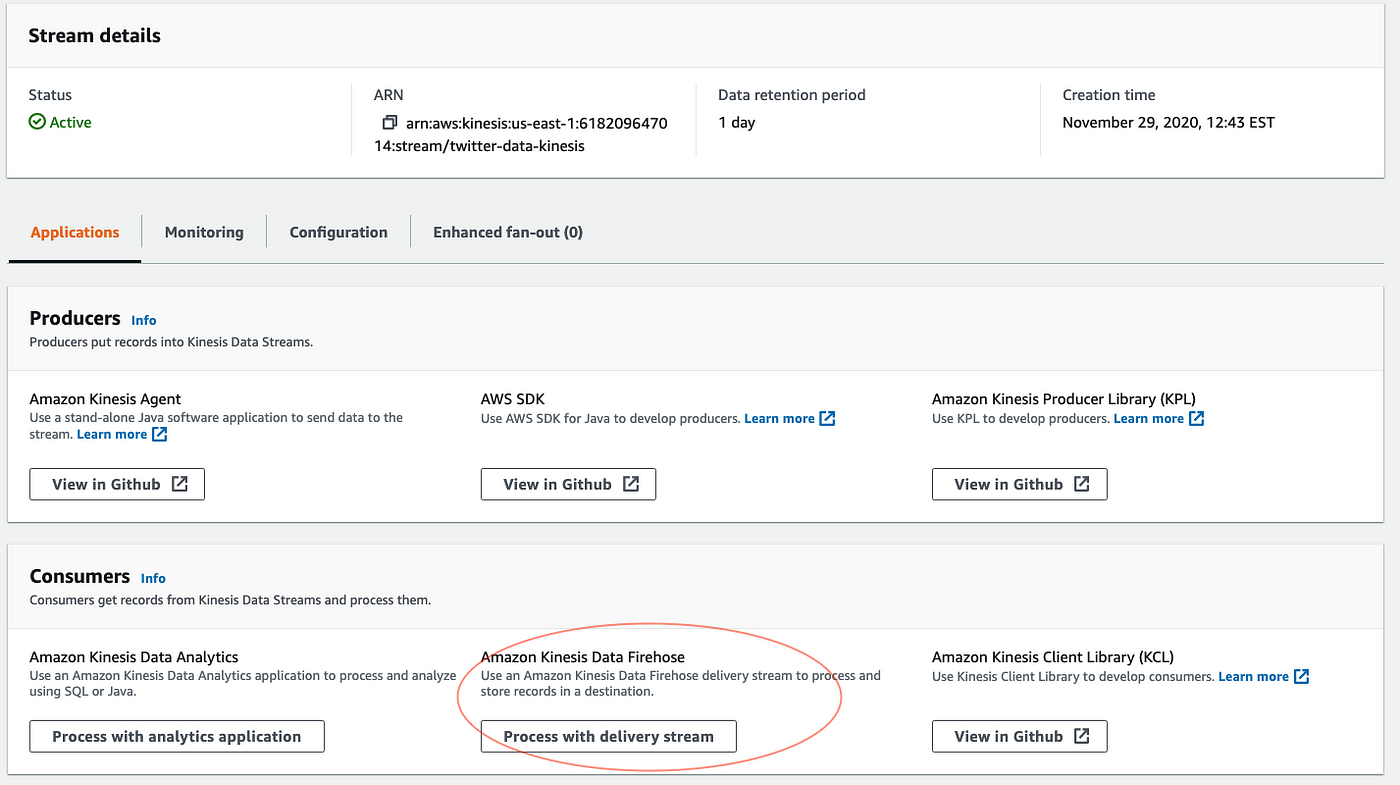
2.2. Consumers
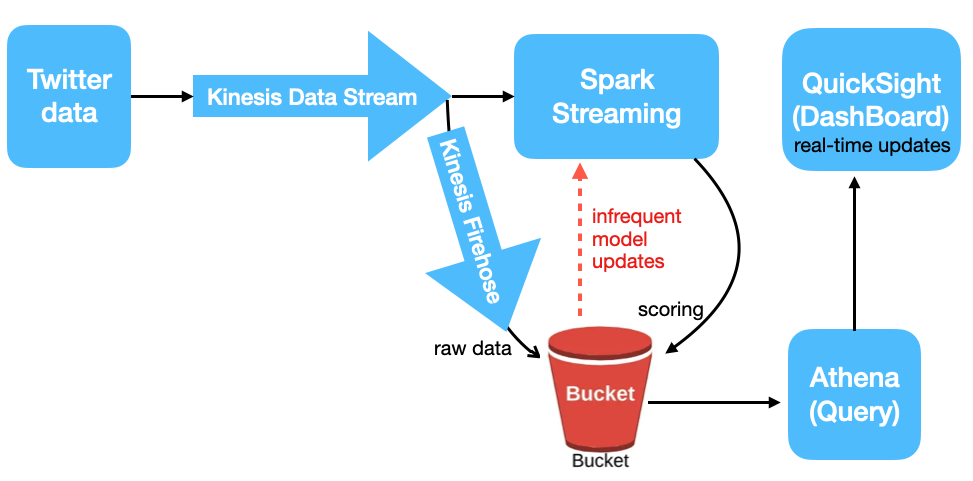
Now with the Tweepy Streaming as the producer to our Kinesis Stream, we will have the consumers on the other side to consume the data in the Stream. The consumers are essentially the applications you will build to process or analyze the streaming data. Refer to the diagram in AWS documentation for Kinesis Data Streams High-Level Architecture.
The Kinesis Firehose is one consumer in our data pipeline because we would like to deliver the raw data into S3 (for the purpose of backups as well as creating our training dataset). Setting up a Kinesis Firehose delivery stream as the consumer for Kinesis Stream is straightforward. You can create it directly from the page of the active Kinesis Data Stream.
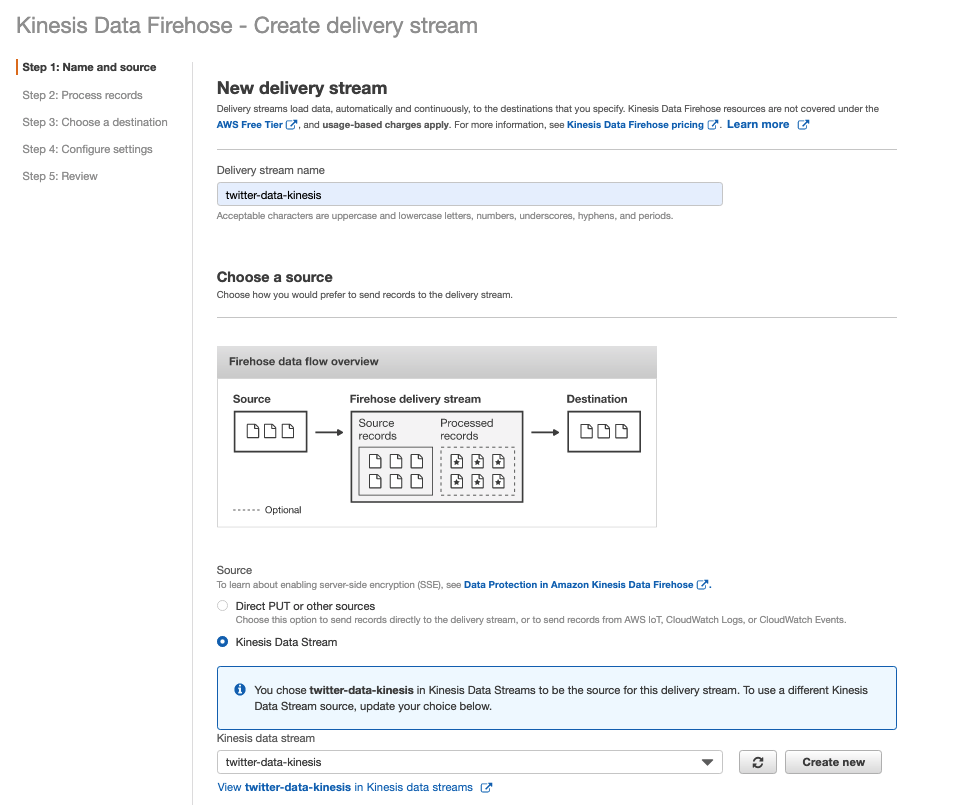
Simply follow the steps and configure the setting wisely in Step 4: how much data to buffer before delivering them into the destination. We will use the S3 bucket as the destination in Step 3. The rationale here is we want to save the raw data from future use, for example, to train our topic model.
Great. When all is set, you can go to the "Monitoring" Tab on the dashboards to inspect the streaming for both Kinesis Data Streaming and Kinesis Firehose. For example, the stream metrics will give you some idea about your data input/output rate for the Kinesis Data Stream. You can dynamically adjust the number of shards within your data stream via resharding.

Our ultimate goal is to perform real-time analysis on the live tweets. Thus, we will create a Spark streaming as one consumer for the Kinesis Data Stream. In other words, the Kinesis Data Stream will be the source of the Spark streaming that we will discuss later. But before we step into the details on that part, let's make a detour and see how to use Spark for data processing and machine learning model training.
3. Spark for data processing and ML model training
Python + scikit-learn is the must-have tool for Data Scientist's daily work. But it becomes awkward when you try to handle tens or hundreds of GB of data in a single machine. Spark comes to the rescue. Apache Spark is a unified engine designed for large-scale distributed data processing. I really like the description of Spark from the great book "Learning Spark":
The central thrust of the Spark project was to bring in ideas borrowed from Hadoop Map‐ Reduce, but to enhance the system: make it highly fault tolerant and embarrassingly parallel, support in-memory storage for intermediate results between iterative and interactive map and reduce computations, offer easy and composable APIs in multiple languages as a programming model, and support other workloads in a unified manner.
The Spark DataFrame (Python) API is very easy to work with if you come from a Pandas background. But watch out for the pitfalls. You need to tune the configuration knobs in order to optimize the performance for the Spark job, given the fact that the data resides in a distributed system. I will give you some simple examples shortly to illustrate this point.
You can have Spark installed on your laptop and run it in standalone mode (a single machine). But in practice, you will run your Spark job in cluster mode in order to leverage the computing power with the distributed machines (i.e., executors). In cluster mode, you will submit a pre-compile Jar file (Java/Scala) or a Python script. In your PySpark application, the boilerplate code to create a SparkSession is as follows.
                from pyspark.sql import SparkSession                # create a SparkSession:
# an object that provides a point of entry to interact with underlying Spark functionality and allows programming Spark with its APIs.                spark = SparkSession.builder.\
                  config("spark.driver.cores", 2).\
                  config("spark.driver.memory", "10g").\
                  config("spark.executor.instances", 1).\
                  config("spark.executor.memory", "10g").\
                  config("spark.executor.cores", 2).\
                  config("spark.sql.shuffle.partitions", 4).\
                  appName("twitter LDA").getOrCreate()                sc = spark.sparkContext
sc.setLogLevel("WARN")
# ship your own written python module for processing
sc.addPyFile("sparkLDA.zip")
How to configure the resource for your Spark Application depends on the computational demand and the available resources in your cluster. DataBricks provides an easy solution to working with Spark. The community edition allows you to access a micro-cluster and play with Spark. Alternatively, you can use Amazon EMR which utilizes a Hadoop framework running on Amazon EC2 for your computing-intensive Spark job. Here let's stick to Amazon EMR. You can easily find the tutorial to set up an Amazon EMR cluster, but there is a super useful step worth highlighting here. You can create a bootstrap action when spinning up the EMR cluster, and this can be used to install additional packages across all cluster nodes. For example, the following shell script will install the NLTK Python package in all cluster nodes; just put the script in a location in AWS S3.
                                  #!/bin/bash
                  sudo python3 -m pip install --upgrade pip
sudo python3 -m pip install nltk==3.4.4
3.1. Spark and YARN
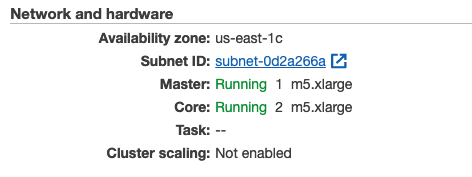
Here I set up an EMR cluster with one master node and two core nodes (worker nodes), both of which are m5.xlarge EC2 instances (4 CPU and 16 GB Memory).
Note that we will submit our Spark Job in the cluster mode with YARN as the Cluster manager. For the configuration of the Spark job submission, there are some important concepts to understand how Spark and YARN interact. I will put some useful resources at the end for your reference. Here are some important notes you may find useful:
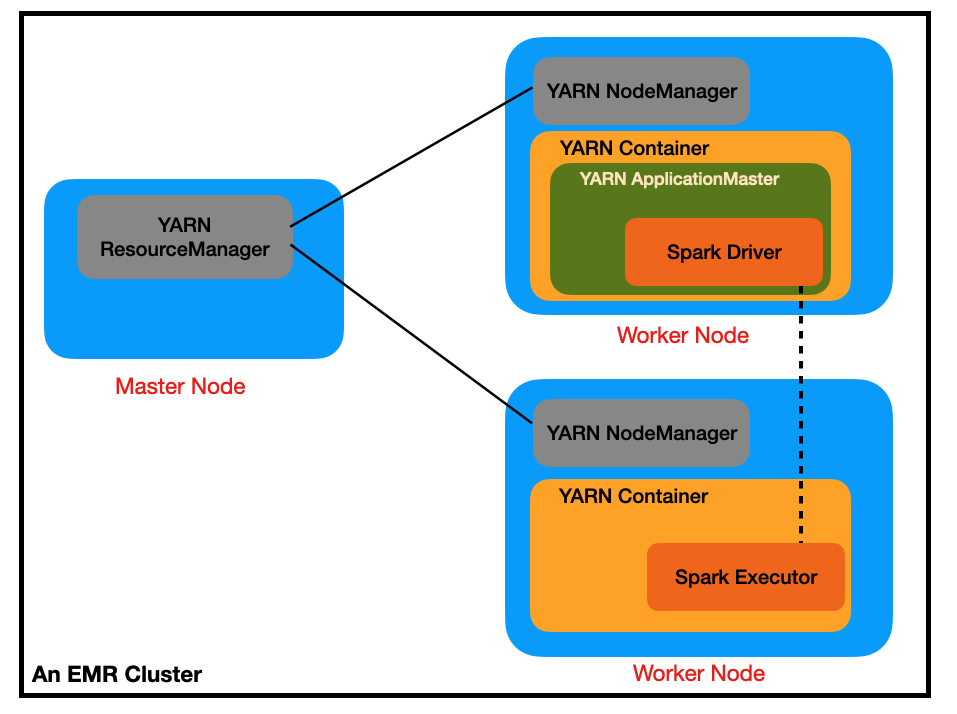
- YARN ResourceManager runs on the master node and NodeManager runs on the worker node(s). They are daemons that form the YARN framework. Note that ResourceManager has two main components: Scheduler and ApplicationsManager.
- In cluster mode, when a Spark application is launched, the Spark driver runs inside an ApplicationMaster. ApplicationMaster is created by ApplicationsManeger for each Spark application to negotiate resources from ResourceManager. Confusingly enough, the ApplicationMaster (with the Spark driver) has its own container in the worker node. Contrastly, in client mode, the Spark driver runs in the client process on the client machine, which is commonly referred to as gateway machines or edge nodes. For the AWS EMR, if you connect to the master node via ssh and run Spark in client mode, then the Spark drive sits in the master node.
- In the architecture of Spark application, we have driver and executors. Each Spark executor runs in a YARN container. So there can be many Spark executors in one worker node as long as the resource (CPUs, memory, etc.) is enough to create the containers.
The following figure can give you a better idea of how Spark and Yarn interact in the use case I created. The Spark Application only has one executor. And I configured 2 cores for the driver and the executor. The rationale here is to leave some cores (usually one) for the OS, given that there are 4 cores on each worker node.
Another important note on the configuration is about the number of executors (spark.executor.instances) and the number of executor cores (spark.executor.cores), and how these ultimately relate to the number of partitions to achieve better performance (i.e., parallelism) for a Spark job. Use my Spark application as an example here:
                spark = SparkSession.builder.\
                  config("spark.driver.cores", 2).\
                  config("spark.driver.memory", "10g").\
                  config("spark.executor.instances", 1).\
                  config("spark.executor.memory", "10g").\
                  config("spark.executor.cores", 2).\
                  config("spark.sql.shuffle.partitions", 4).\
appName("twitter LDA").getOrCreate() - Only one Spark Executor. This is bad (low parallelism) because we don't have multiple executors executing tasks in parallel, but to save the cost I do not want to spin up another worker node : (
- Two cores per Executor. You will see I partitioned the dataframe into 4 partitions. Ideally, two cores will work on two partitions in parallel at a time (we call a single core working on a single partition as a task). So the parallelism here is acceptable. You may wonder why I don't partition the dataframe into 2 partitions. You can do that, but it should not affect too much here. For a core of the executor, the matter is just processing one big task v.s. processing two small tasks. Another point is, by using 4 partitions, each of the partition has a size of ~ 60 MB given the size of my training data, which is considered reasonable. A large partition can cause memory pressure during shuffles (although this is not an issue here because we have 10 GB for the executor memory). On the other hand, it's a bad idea to create too many small partitions that will slow down the system due to the communication between driver and executors. In general, a good practice is to have the lower bound of the number of partitions as 2 x the total number of cores (this is also the default for spark.default.parallelism in AWS EMR, see AWS blog). Another bad example is to partition the data into 3 partitions given the total number of cores is 2. One core could be idle awaiting the other core to finish the task.
- You may also want to configure spark.sql.shuffle.partitions to control the shuffle partitions created during the shuffle stage. The default value for spark.sql.shuffle.partitions is 200, which is too high for small workloads. In my example, I set it as 4: 2 x the total number of cores.
You may find maximizeResourceAllocation and dynamicAllocation useful when running the Spark application in EMR. Overall, performance tuning is a big deal for Spark usage and we only mentioned some important aspects. Another common practice is to use cache wisely to avoid repeated computation. There are many posts and tutorials out there discussing more details on the configuration and they are definitely worth your time.
3.2. LDA in Spark ML
Since we are interested in discovering the underlying topics for the tweets, we need to go through some common steps for the NLP task and extract the features that can be fed to the LDA model. The details of the LDA model are out of the scope here. I owe you a clear explanation and will write a post on this topic in the future. But the core idea is: we treat each tweet as a document and a document is a mixture of multiple topics, where each topic is characterized by a distribution over words. Given the fact that a document is a collection of words, we can learn the underlying topic mixture of each document.
Let's move on to the Spark part. First, we need to load the raw tweets we have collected. Here I used the Tweets in November as the training dataset and Tweets on December 1-2 as the test dataset.
                Total tweets in training dataset:
1,280,121
Total tweets in test dataset:
97,921
Here is the code snippet for loading data:
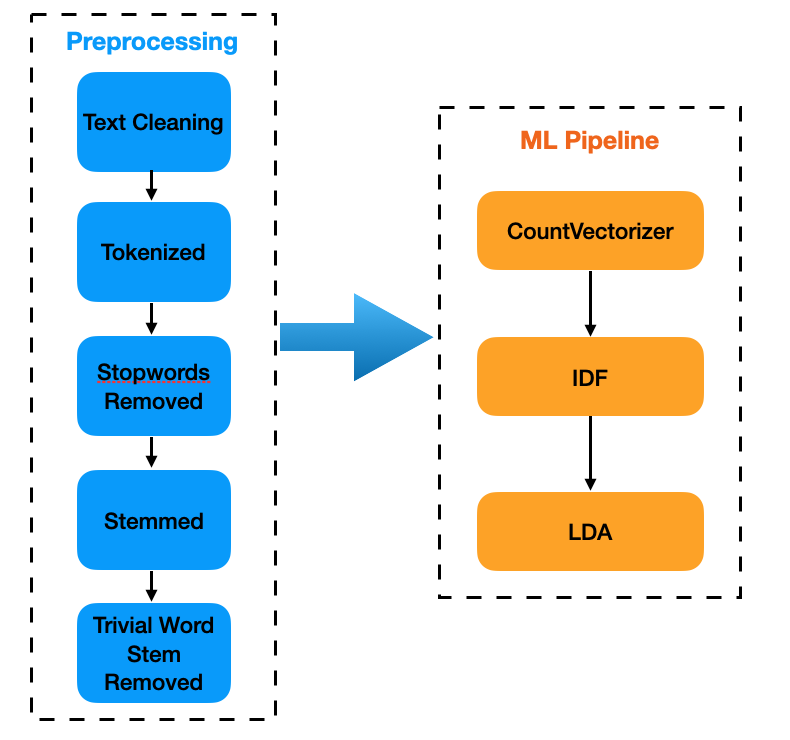
The following code snippet for text processing should give you some idea of how the Transformer transforms one DataFrame to another DataFrame (you can use chaining for concise syntax).
Note that I used stemming instead of lemmatization for efficiency. Spark's native library doesn't provide Stemming and Lemmatization functionalities. A quick solution is to create your own user-defined functions (UDF). An alternative is to adopt Spark-NLK. I also found that further removing trivial stemmed words helps for the LDA model. Then we build the ML pipeline to fit the LDA model. We use TF-IDF to build the features for LDA model training. It's worth noting that the IDF step is very important, otherwise our model will be overwhelmed by the common words that occur too often in every tweet.
Choosing the numbers of topics as 5, we got the underlying topics with the associated top words as follows:
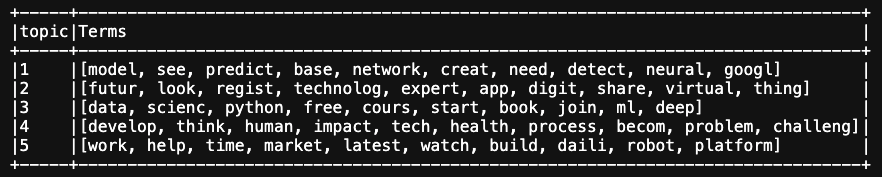
The choice of numbers of topics (k) involves many nuances such as the prior information you have, or simple trial-and-error. The output topics should achieve your desired level of interpretability, while this is usually subjective and challenging. We can see Topic 1 associated with [neural, network, google], so it could be tweets about the latest research in machine learning and AI. For Topic 3, it could be marketing promotion on data science training. And Topic 4 seems like some big topic on human society with the development of machine learning and AI (it is also interesting to see the word "health").
We saved the trained LDA model in S3, and use it to discover the underlying topics for the live tweets later. To enrich the data analysis, I also introduce the text sentiment as another dimension. This is achieved by simply including TextBlob in Spark Streaming which I will show you in the next section. Note that TextBlob sentiment is not considered as a machine learning approach since it simply determines the sentiment score by the average of the pre-defined score of each word in the text.
4. Spark Structured Streaming
We will use Spark Structured Streaming to process real-time data.
Internally, by default, Structured Streaming queries are processed using a micro-batch processing engine, which processes data streams as a series of small batch jobs thereby achieving end-to-end latencies as low as 100 milliseconds and exactly-once fault-tolerance guarantees. (from Spark documentation)
Spark Structured Streaming provides a simple API interface for both batch and streaming workload, compared to Spark Streaming which is powered by RDDs (strictly speaking, we are not dealing with real-time processing here since Spark processes streaming data on a micro-batch basis). Coding with Spark Structured Streaming is very easy; you just define the DataFrame from a streaming data source and the DataFrame operations are the same. The basic concept is to treat a stream as an unbounded, continuously appended table (check Spark documentation for more details).
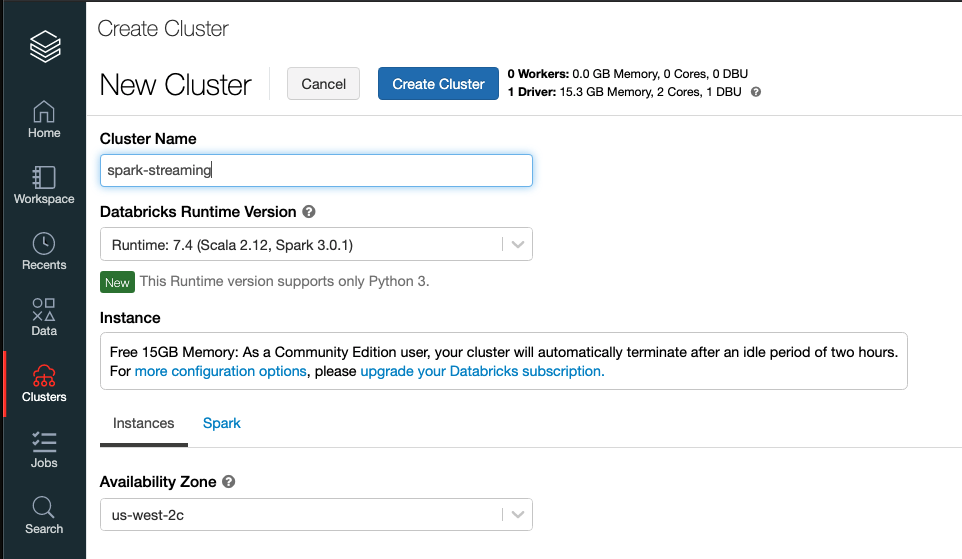
We will work in a Notebook environment (DataBricks Community Edition) to illustrate how this works, but eventually, a Spark Streaming will run in your machine (AWS EC2 or EMR) 24/7 in production for the (near) real-time processing purpose.
4.1. Set up a Spark cluster on DataBricks
First, create a cluster on DataBricks. Two additional steps may require:
- Install the Python libraries if needed. In my case, I installed NLTK for stemming, and TextBlob for naive sentiment analysis.
- Mount the AWS S3 bucket to dbfs file system, so that we can load our pre-trained Spark model and save the streaming processed data into S3 as our destination.
4.2. Set up Spark Streaming
The syntax is almost the same as we read the DataFrame, but now we use "readStream". Note that:
- Kinesis Data Stream is the source for our Spark Streaming, which has been set up in Section 2.
- We configure the "intialPosition" as "latest", which means the streaming reads starting from the most recently added record. You may switch to "TrimHorizon" so it will start from the oldest record available (in our case, it's 1 day since the retention period is 24 hours for Kinesis Data Stream).
Refer to the DataBricks documentation for more details on Kiensis for Structured Streaming.
                kinesisStreamName = "twitter-data-kinesis"
kinesisRegion = "us-east-1"                awsAccessKeyId = "your_awsAccessKeyId"
awsSecretKey = "your_awsSecretKey"                kinesisDF = (spark
                  .readStream
                  .format("kinesis")
                  .option("streamName", kinesisStreamName)
                  .option("region", kinesisRegion)
                  .option("awsAccessKey", awsAccessKeyId)
                  .option("awsSecretKey", awsSecretKey)
                  .option("initialPosition", "latest")
                  .option("format", "json")
                  .option("inferSchema", "true")
                  .load())
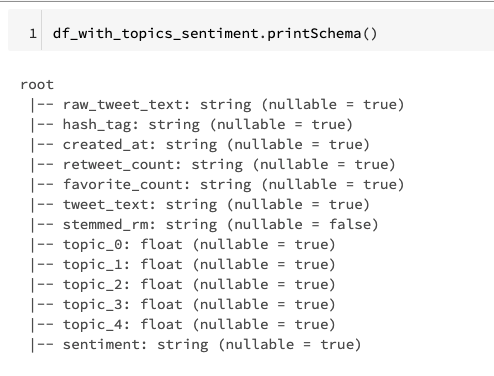
The KinesisDF will be a streaming DataFrame, with the schema as follows:
DataFrame[partitionKey: string, data: binary, stream: string, shardId: string, sequenceNumber: string, approximateArrivalTimestamp: timestamp] The data of the live tweets are in the "data" field, so we need to first parse it to the schema we defined before (i.e., the way you collect the tweet data in the Tweepy Streaming), and then we can process the data and use the Spark LDA model to find the underlying topics for every tweet. The code snippet is as follows and you can find the notebook here.
Let's check the schema of the result DataFrame:
We will write the result DataFrame to an output sink. It could be a DataBase in AWS RedShift, or an AWS ElasticSearch. Here we choose S3 as the output sink.
                outputPath = "your_S3_location_to_save_spark_streaming_result"
ckp_location = "your_S3_location_to_save_spark_streamingcheckpoint"                query = (df_with_topics_sentiment
                  .writeStream
                  .outputMode("append")
                  .format("csv")
                  .option("sep", "\t")
                  .trigger(processingTime="15 minutes")
                  .start(path=outputPath, checkpointLocation=ckp_location))                query.awaitTermination()
This code snippet will start the query and write the result DataFrame to the desire S3 bucket. Note that:
- "Append" mode is used because we simply add new rows to the result DataFrame (i.e. stateless transformation on DataFrame). Choosing append/complete/update mode depends on the logic of your data processing.
- We trigger the process every 15 minutes. There are other options to meet a more real-time need, but here our data input rate is not very high so let's stick to an interval of 15 minutes for a demo purpose.
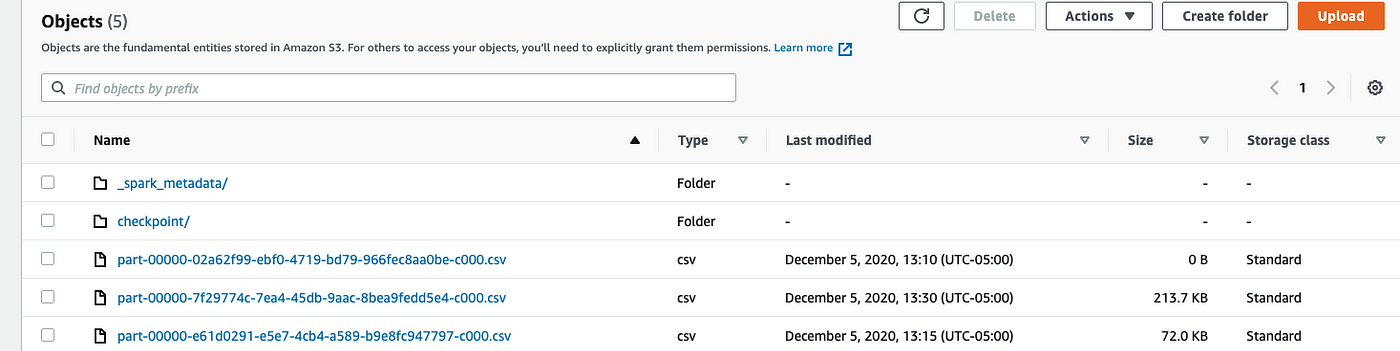
After a while, we will see the output data show up in the S3 bucket, cool! Now with the data (which keeps increasing in real-time), let's move to the analysis step.
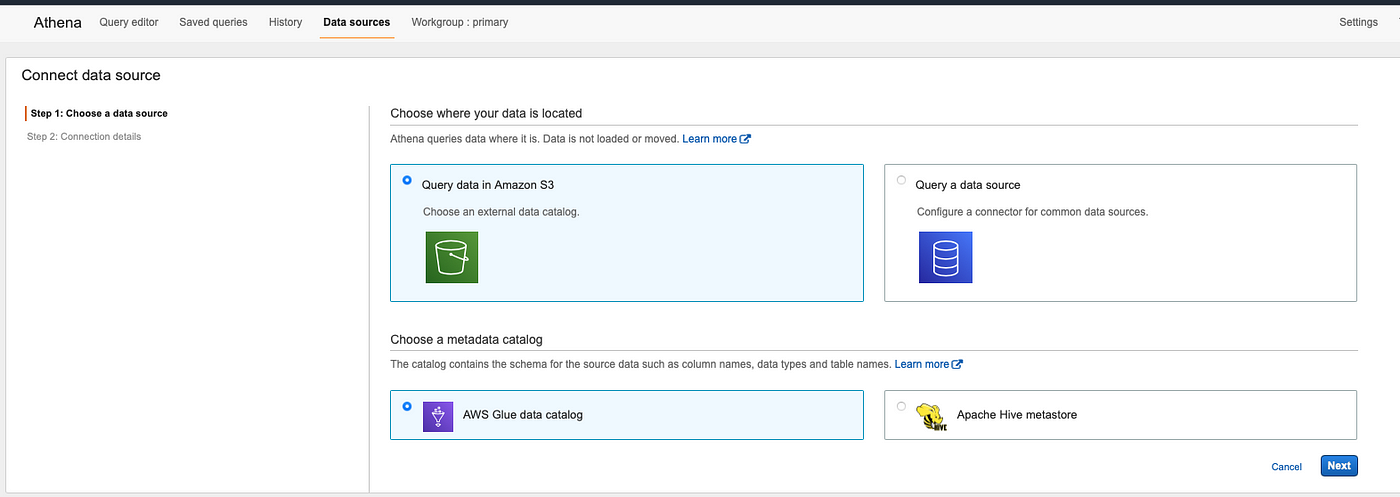
5. AWS Athena for Data Analysis
Definition from AWS documentation for Athena is as follows. Although it makes more sense to have a DataBase in production, we use Athena which is serverless to access data in S3, so we can save the cost by avoiding spinning up a cloud database service such as AWS RedShift.
Amazon Athena is an interactive query service that makes it easy to analyze data in Amazon S3 using standard SQL. Athena is serverless, so there is no infrastructure to manage, and you pay only for the queries that you run.
Athena is easy to use. Simply point to your data in Amazon S3, define the schema, and start querying using standard SQL. Most results are delivered within seconds. With Athena, there's no need for complex ETL jobs to prepare your data for analysis. This makes it easy for anyone with SQL skills to quickly analyze large-scale datasets. (from Amazon documentation)
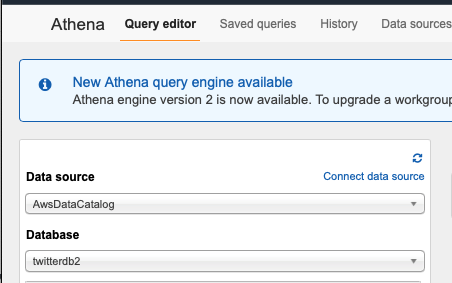
Log in to the AWS console and go to the Athena service. We first need to create a Table which connects to the data in S3. The procedure is quite straightforward. Note that you need to provide the schema for the table because the raw data stored in the S3 bucket is schemaless.
After creating the table, now you can write the query in the Query editor to do the analysis. For example. show some samples of the tweets and their associated topics and sentiment results:
SELECT tweet_text_processed, topic_1, topic_2, topic_3, topic_4, topic_5, sentiment FROM "twitterdb3"."twitter_data_analysis" where sentiment is not null limit 20; 
Check how the topics distributed on the live tweets:

Run some more complicated query to get the aggregation information: count the number of tweets in different topics grouped by sentiment:
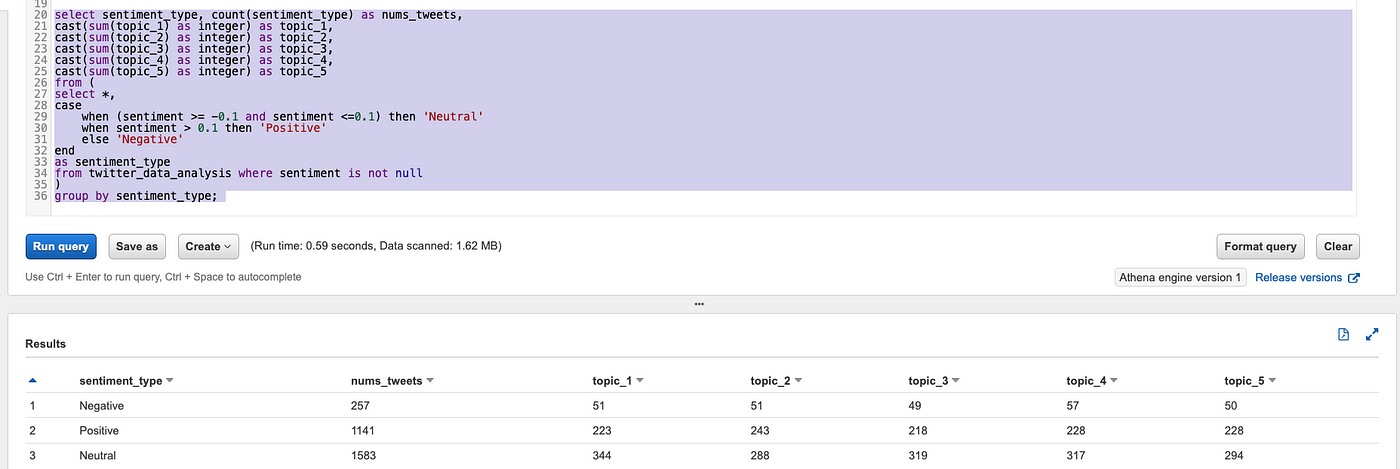
Note that Spark Streaming writes new data into the S3 bucket every 15 minutes, so when you run the query again later, you will get the latest result.
6. AWS QuickSight for Visualization
Being able to run the query on the data streaming is nice but not enough, because you will find data visualization is always necessary to provide more insight, particularly in the business. Here we will use QuickSight as a handy tool that can connect to Athena directly. And the in-memory engine, SPICE can make the real-time analysis very efficient.
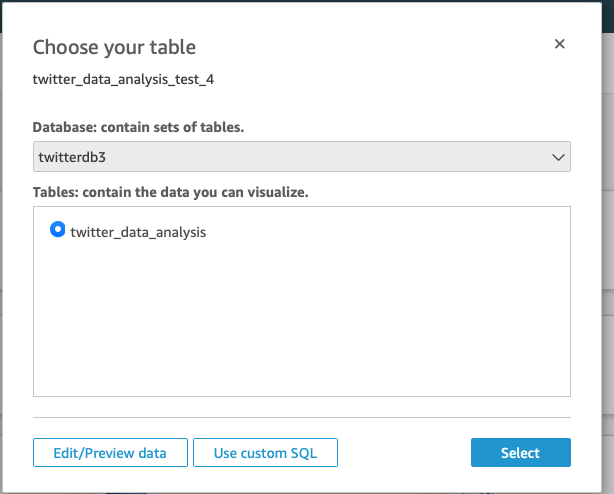
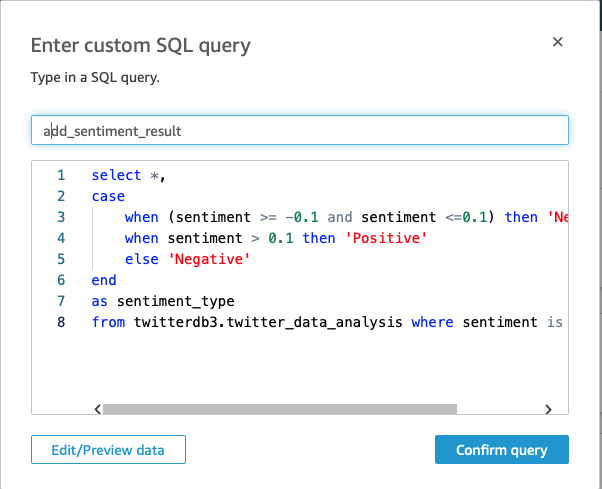
Go to the Datasets Tab and create your "dataset" choosing the existing data source in Anetha (see documentation). Here I had one extra step since I wanted to create a new field "sentiment_type" from the sentiment score.
With the dataset, now you can play with Visual Types to create the desired analysis. Some examples for our tweets analysis are as follows.
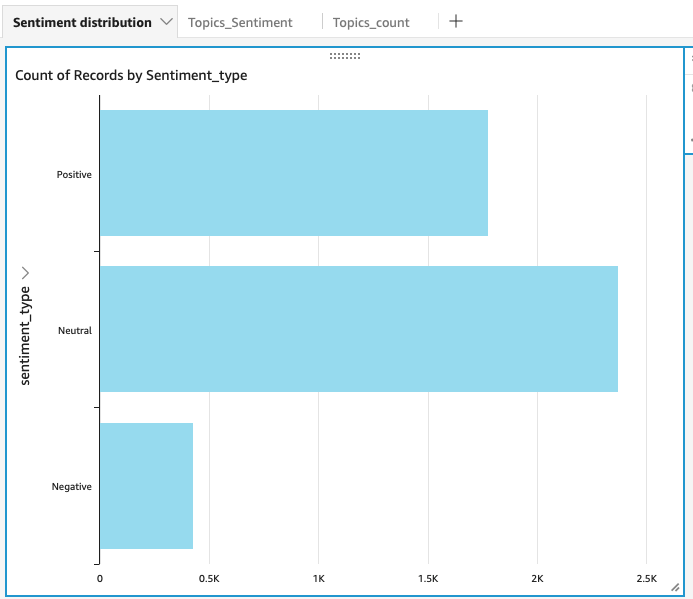
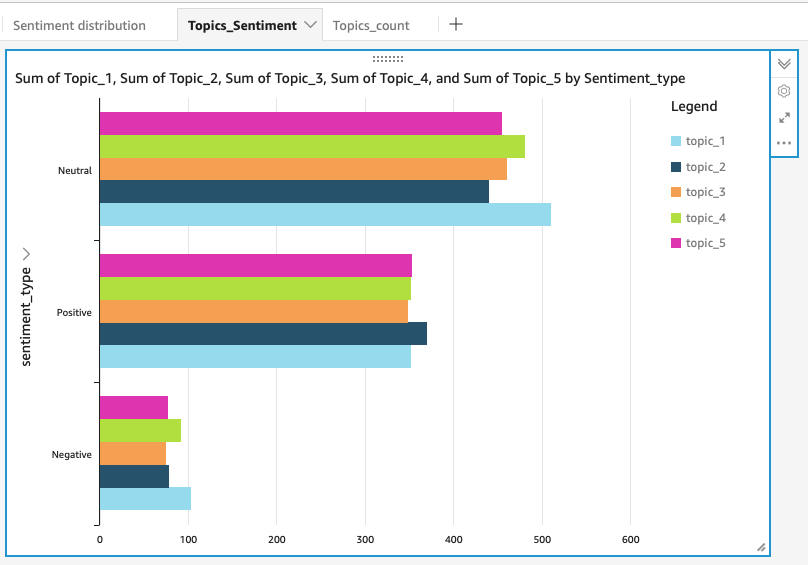
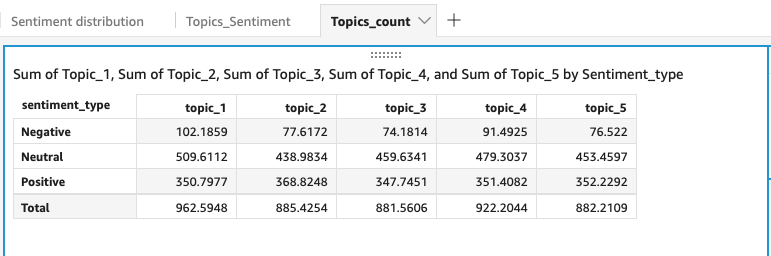
Another nice feature is you can schedule the refresh, so the analysis results can be updated automatically.

7. What Is Next
I glad you reach this point of reading. The post is much longer than I expected when I started writing. We began with creating our Tweepy Streaming, and used the big data tools for data processing, machine learning model training and streaming processing, then build a real-time dashboard. We had a quick dive into some important concepts in Spark, Streaming. We got a sense of how to build the data architecture for a streaming application. But there are many other important aspects that we can further explore.
Data Drift and Model Retrain
There will be data drift or model performance degradation in the real world, so we need to update our model as time goes by. In most of the use cases, we don't need the ML model to be updated very frequently. Here, for example, retraining our LDA model monthly will be reasonable. The other extreme case is we want to update the model in real time, which is a very challenging task in practice (Spark supports Streaming Linear Regression and Streaming KMeans). And the latency will be a problem. A more common scenario is batch retraining, and the model retraining can be scheduled periodically or be triggered when drift is detected. This falls into the topic of AutoML and you will find Kubernetes very useful. See a great post on this topic.
Real-Time Scoring
In this post, we use Spark Streaming to get a balance between throughput and latency. It's barely near real-time. The Spark framework cannot meet the low latency requirement for real-time scoring because of the mini-batch processing.
However, the question here is: do we really need such low latency? The answer is no. The tweet analysis application we built is not latency-critical, so we can roll it back to the Batch mode and score the new data, let say every 3 hours. Then we need to reflect on this and change our pipeline architecture accordingly. For example,
- we don't need Spark Streaming, which means we can use Kinesis Firehose to put the records from Tweepy Streaming into S3 directly, instead of using Kinesis Data Stream.
- Now we use Spark for batch processing every 3 hours. This is good because we don't need to keep the Spark cluster running which could be costly. We can run the Spark cluster periodically for batch processing. Then Airflow will fit our needs here. We can write the script to schedule our workflow: set up an AWS EMR, run the Spark job for the new data, save the result into S3, then shut down the EMR cluster.
Airflow will be the magic to orchestrate the big data pipeline. I will write a post on it following our example here. So please stay tuned!
Other Thoughts
There are more to discuss regarding different components in our data architecture. At the end of the day, you have to choose what fits your best depending on the use case. For example, you may find a database is necessary in production instead of using Athena to run ad-hoc queries. Therefore, we can use AWS RedShift as a data warehouse, then leverage Tableau/SuperSet as more powerful data visualization tools rather than QucikSight. Another possible scenario is loading the streaming data into AWS ElasticSearch if your application requires heavy text analysis.
8. A Closing Note
Big Data tools and Cloud Computing are exciting but can also be intimidating for beginners. I hope you have found this post shed some light on this topic. Thanks for your time! I am interested in discussing best practices in Machine Learning. Feel free to leave your comments and thoughts.
P.S., I have cited many definitions for AWS and Spark from online documentation. Please kindly let me know if you think any of your work is not properly cited.
thibeaultwasm1955.blogspot.com
Source: https://towardsdatascience.com/how-to-build-a-real-time-twitter-analysis-using-big-data-tools-dd2240946e64
0 Response to "Can I Get a Real Time Twitter Data Feed"
Post a Comment